Administration
System configuration screens: users and roles, company settings, ZATCA onboarding, document counters, print designer, and the approval workflow.
Users
Route: User menu › Users — /admin/users
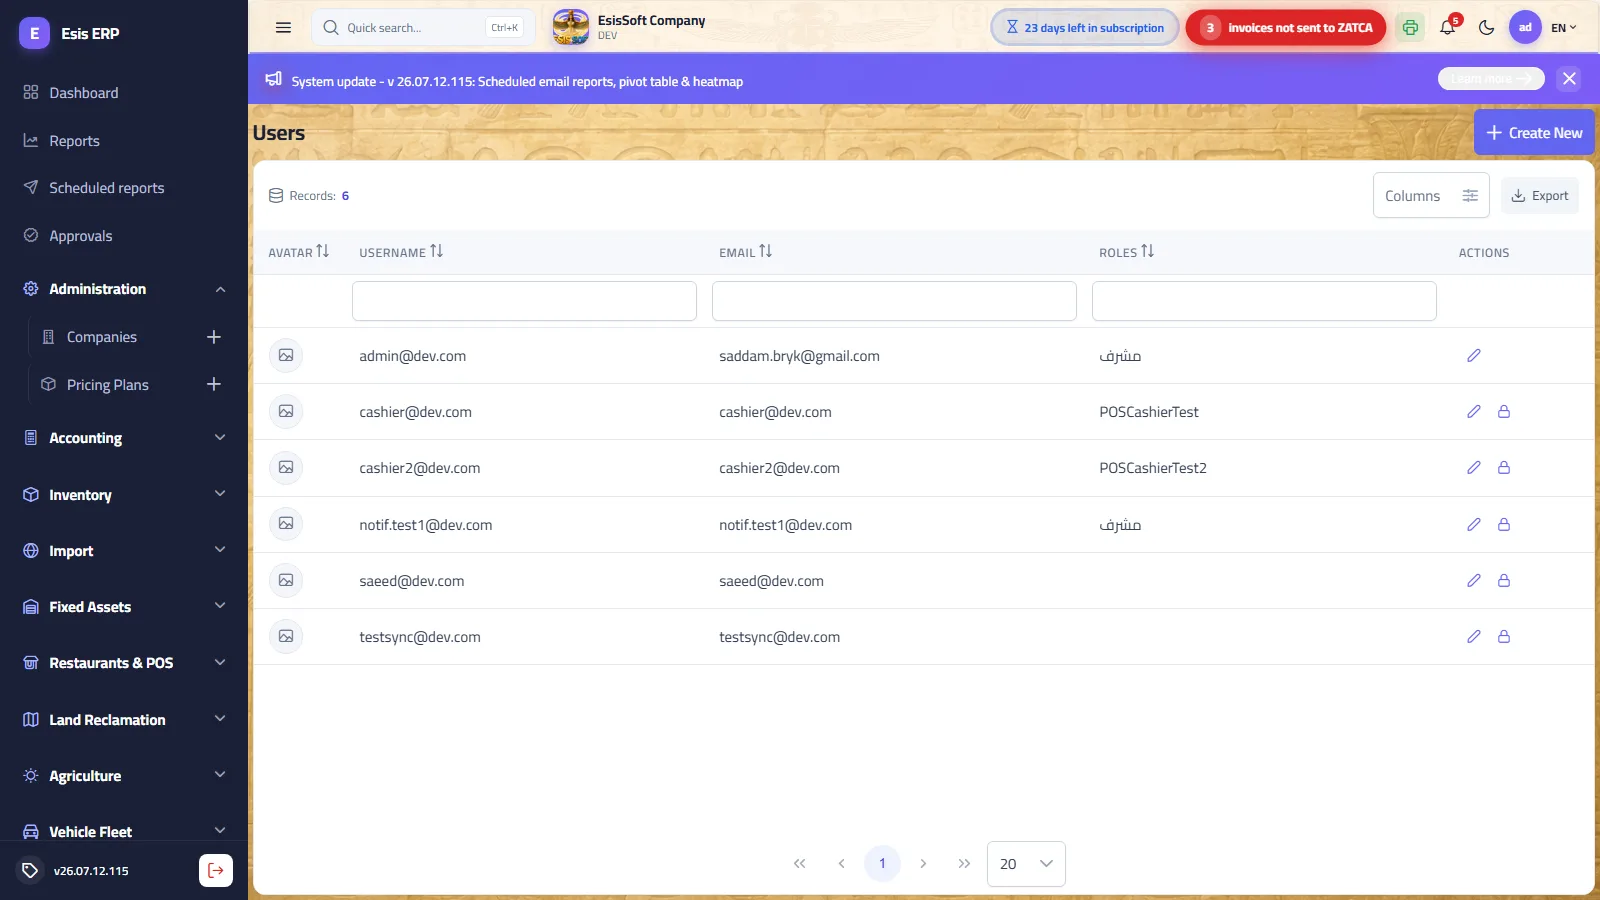
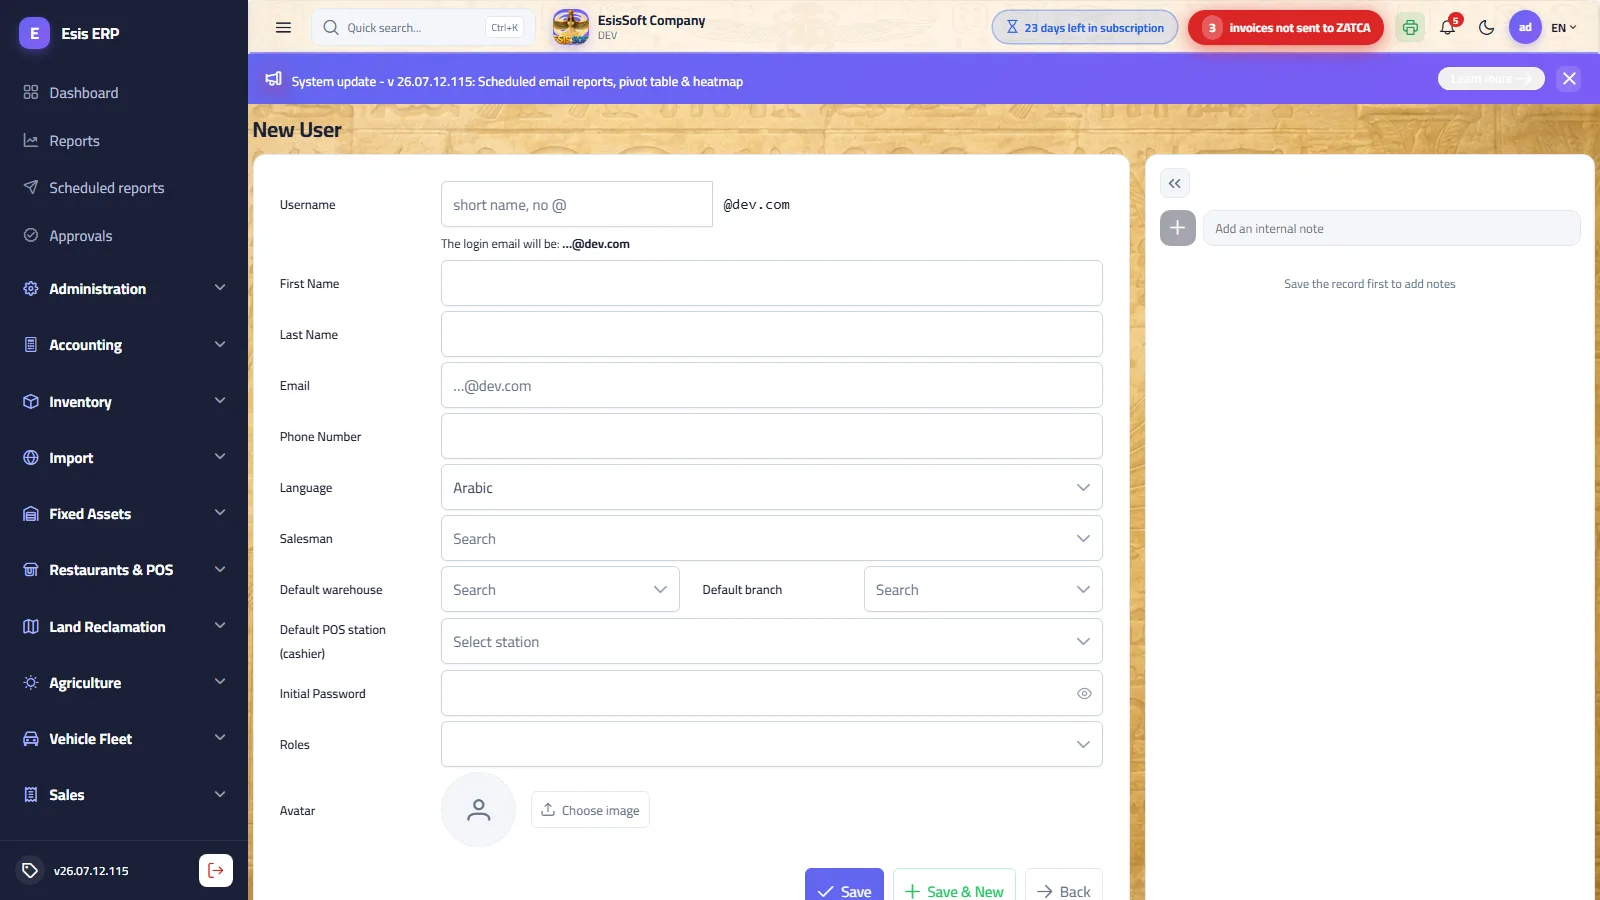
Purpose: create and maintain employee accounts. Each user gets a login identity, an interface language, default branch/warehouse, and one or more roles that define exactly what they may see and do. Use it whenever an employee joins, changes duties, or leaves.
The list
Columns: avatar, username, email, roles. Row actions:
- Edit (pencil): opens the full-page editor.
- Lock / Unlock (padlock): immediately blocks or restores login without deleting the account. The company's protected super admin can never be locked (the button is hidden and the server refuses it).
Field reference (user editor)
| Field | Meaning / rules |
|---|---|
| Username | Creation only. Type just the short name (letters, digits and . _ -, no @). The system appends your company tail automatically, producing the login email name@companycode.com. Shown read-only when editing. |
| First / Last name | Display name shown in lists, notes and approvals. |
| Contact address (for password resets and notifications). If left empty on creation, the generated login address is used. | |
| Phone number | Optional contact number. |
| Language | The user's preferred interface language: Arabic, English or Indonesian. See "Language propagation" below. |
| Salesman | Links the account to a salesman card — his sales documents default to that salesman. |
| Default warehouse / Default branch | Pre-selected on every new document the user creates (they can still change it if their role allows). |
| Default POS station | Appears only when Restaurant POS stations exist — the cashier's station. |
| Initial password | Creation only, minimum 10 characters. Later changes go through Reset password / the user's own profile. |
| Roles | Multi-select — the user's permissions are the union of all selected roles. |
| Active | Edit only. Untick to disable the account without deleting it. |
| Avatar | Always the last field. The picture uploads after the record saves. |
Worked example — create a user
- User menu › Users › Create.
- Username:
m.ali— the hint shows the final login:m.ali@yourcode.com. - Fill first/last name; pick Language = English if the employee prefers English.
- Choose the default branch and warehouse he works in.
- Enter an initial password of at least 10 characters and tell it to him privately.
- Tick his role(s), e.g. "Storekeeper", then Save (or Save & New to add the next employee).
Language preference propagation
The app ships in three languages: Arabic (RTL), English and Indonesian. Two mechanisms cooperate:
- User preference (this screen): the Language field is stored on the account. At every login the interface switches to that language automatically.
- Top-bar language dropdown (ع / EN / ID): any user can switch on the fly; the choice is remembered in that browser until the next login re-applies the account preference. Switching to Arabic also flips the whole layout to right-to-left.
Troubleshooting
| Symptom | Cause / fix |
|---|---|
| User cannot log in | Check the account is Active and not Locked; verify he is typing the full generated address name@companycode.com. |
| User can't see a whole module | Either his role lacks the module in Level 1 of the role editor, or the company's subscription doesn't include that module (host: Tenants › Subscription). |
| User sees a screen but buttons are missing | Level-2 grants: he has View but not Create/Edit/Post etc. — adjust the role. |
| Wrong language after login | The account's Language field wins at login — change it here. |
FAQ
- Can I delete a user? No — lock or deactivate instead, so his document history stays attributed.
- Can one user have several roles? Yes; permissions accumulate (union).
- Why can't I lock a certain user? That is the protected company super admin — it can never be locked out.
- Does changing a role take effect immediately? On the user's next login / token refresh.
Roles (permissions)
Route: User menu › Roles / Permissions — /admin/roles
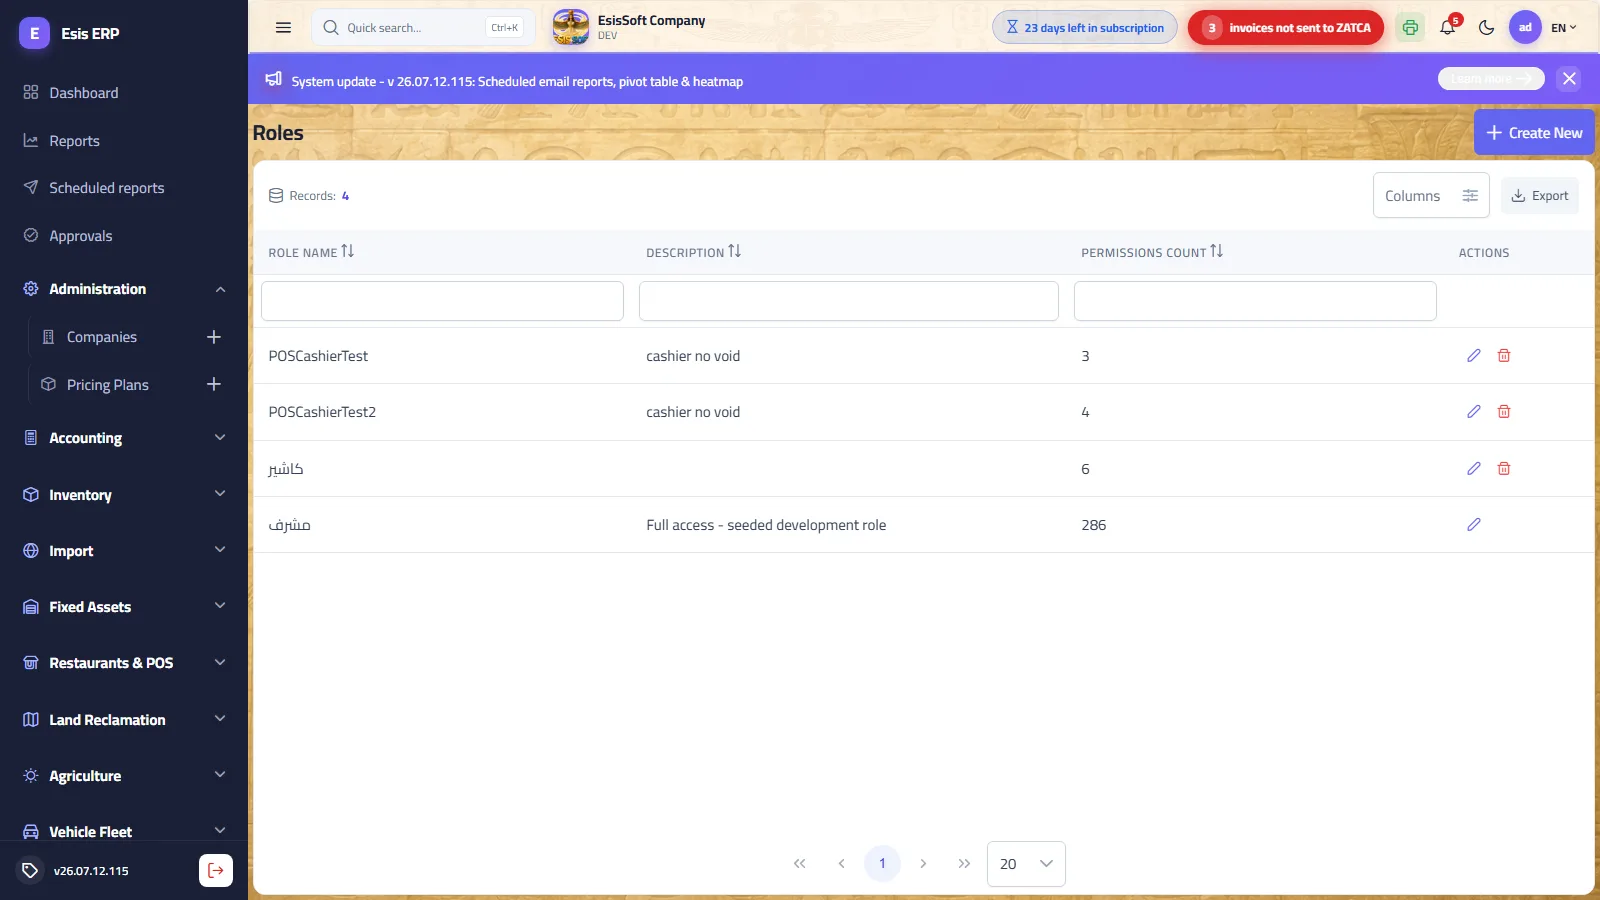
Purpose: a role is a named permission bundle (Accountant, Storekeeper, Cashier…) assigned to users. The editor has a name, a description, and three permission levels shown as tabs:
| Level | Tab | What it controls |
|---|---|---|
| 1 | Modules | Which whole modules the role may enter at all. A disabled module is blocked entirely, regardless of any screen grants below it. |
| 2 | Screens & Reports | The permission matrix: per-screen action grants, and per-report view grants. |
| 3 | Data | Data-level restrictions applied on top of screen permissions. |
Level 1 — Modules
One card per sidebar module: Administration, Accounting, Inventory, Sales, Purchasing, Imports, Assets, Restaurants, Land, Agriculture, Fleet, Reports. Ticking a card grants entry to that module.
Level 2 — the permission matrix
Rows are screens, grouped under the same headings you see in the sidebar (click a group header to fold it). Reports appear as their own rows with their registry names. Columns are the six actions — a checkbox exists only where the screen actually supports the action, and each row has an "all" checkbox:
| Action | Grants |
|---|---|
| View | Open the screen / see the list. Without it the screen disappears from the sidebar. |
| Create | Add new records / documents. |
| Edit | Modify existing records. |
| Delete | Remove records (drafts; posted documents must be unposted first). |
| Post | Post the document — generates its journal entry and locks it. |
| Unpost | Reverse a posting to allow correction. Grant sparingly. |
Level 3 — data scopes
| Scope | Effect |
|---|---|
| Journal entries: own only | The user sees only journal entries he created himself. |
| Allowed cost centers | Restrict to the selected cost centers. Empty = all (unrestricted). |
| Allowed branches | Restrict documents/data to the selected branches. Empty = all. |
| Allowed warehouses | Restrict stock documents and balances to the selected warehouses. Empty = all. |
Worked example — a "Storekeeper" limited to 2 warehouses
- User menu › Roles › Create. Name:
Storekeeper. - Tab Level 1: Modules — tick Inventory only (Sales/Purchasing come with it as one commercial module; leave Accounting, Administration etc. off).
- Tab Level 2: Screens & Reports — under Inventory grant: Items (View), Goods receipts (View/Create/Post), Stock adjustments (View/Create), Inventory transfers (View/Create/Post). Leave Delete and Unpost unticked.
- Tab Level 3: Data — in Allowed warehouses pick exactly the two warehouses, e.g. "01 - Main warehouse" and "03 - Spare parts".
- Save. Open Users, edit the storekeeper's account, tick the new role.
- Result: after his next login he sees only the Inventory module, only the granted screens/actions, and every list, lookup and document is filtered to those two warehouses.
FAQ
- Screen grants are ticked but the user still sees nothing? The module itself is off in Level 1 — Level 1 always wins.
- Do scopes affect reports? Yes — data restrictions apply on top of everything the role opens.
- Best practice? Build functional roles (Accountant, Salesman…) instead of one per employee — change the role once and it applies to everyone holding it.
- Who can approve documents? That is configured per document type in the Approvals screen (below), by pointing an approval rule at a role.
Settings
Route: User menu › Settings — /settings
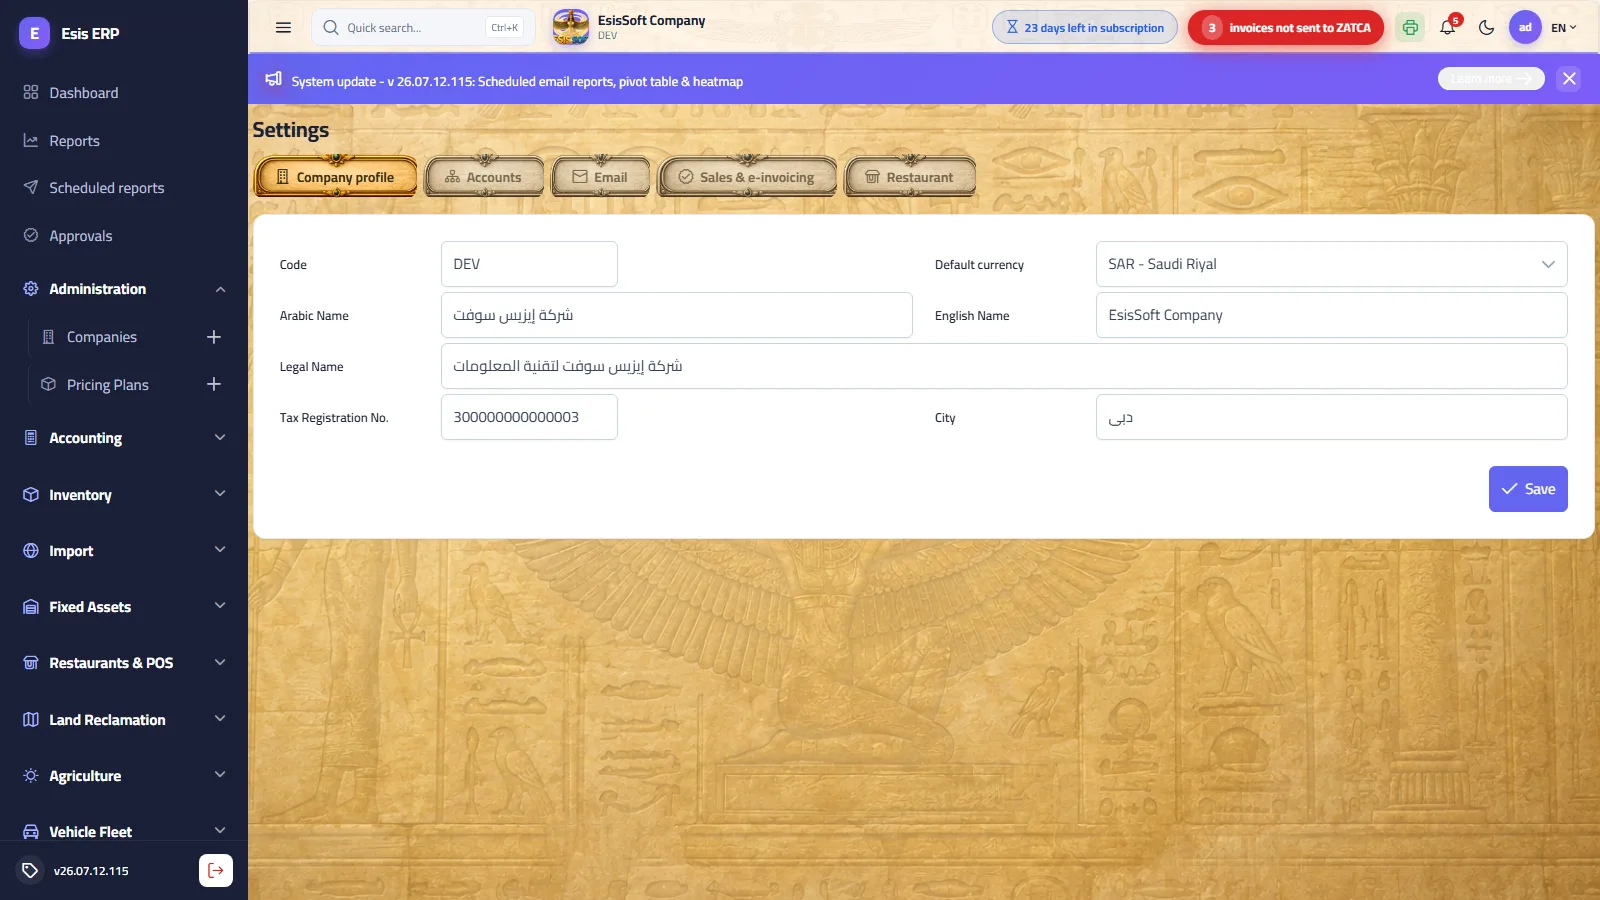
Purpose: company-wide configuration across fifteen tabs — only those your company’s modules enable are shown. These are the main ones; the rest are in the module tabs:
| Tab | Key settings |
|---|---|
| Company profile | Company code (read-only), default currency, Arabic/English names, legal name, VAT registration number, city. Saving refreshes the top-bar company block and report letterheads instantly. |
| Accounts | The automatic posting accounts — the foundation of every automatic journal entry (full list below). |
| Outgoing SMTP used for password resets and notification emails in your company's name. | |
| Sales & e-invoicing | Default VAT rate — the rate every new item starts at; changing it does not touch existing items and the rate stays editable per item, so set it to zero for a company that is not VAT-registered. Item numbering — "Sequential" hands a new item its next number and locks the box, "Manual" leaves the box for you to type your own code (letters and digits); either way a duplicate code is rejected and the code is fixed once saved. Plus "Auto-send invoices to ZATCA on posting" — when on, a sales invoice is signed and reported the moment it is posted. |
| Restaurant | POS receipt footer text, default kitchen printer, kitchen warehouse (ingredient depletion), dine-in service charge %. |
The Accounts tab — every link and what it drives
Each field is a searchable chart-of-accounts picker (posting accounts; the two "parent" fields list group accounts). Grouped in four sections:
| Section | Account link | Drives |
|---|---|---|
| Sales | Sales revenue account | Credit side of every sales invoice. |
| Accounts receivable (control) | Customer debt posted on credit invoices and settled by receipts. | |
| VAT output | VAT collected on sales. | |
| Cost of goods sold | COGS entry generated with each sales invoice. | |
| Purchasing & inventory | Accounts payable (control) | Supplier debt from purchase invoices. |
| VAT input | Deductible VAT on purchases. | |
| Inventory account | Stock value from receipts/issues. | |
| Inventory adjustments | Counterpart of stock adjustment documents. | |
| Import cost accrual | Landed-cost accrual in the Imports module. | |
| Treasury, banks & cheques | Default cash box | Cash side of cash invoices and vouchers. |
| Default bank account | Bank side of transfers and card payments. | |
| Cash boxes parent account | The tree node new cash boxes are created under. | |
| Banks parent account | The tree node new bank accounts are created under. | |
| Notes receivable (incoming cheques) | Post-dated cheques received. | |
| Notes payable (issued cheques) | Post-dated cheques issued. | |
| FX difference account | Gains/losses when settling foreign-currency documents. | |
| Business modules | Vehicle & trip expenses | Fleet expense postings. |
| Trips (freight) revenue | Fleet trip revenue. | |
| Crops work-in-progress | Agriculture season costs accumulate here. | |
| Harvest inventory | Harvested produce entering stock. | |
| Land projects work-in-progress | Land reclamation project costs. | |
| Restaurant sales revenue | POS order revenue. | |
| Service charge (restaurant) | The dine-in service charge %. | |
| Tips payable (restaurant) | Tips collected for staff. |
The Restore defaults button (after confirmation) re-applies the standard chart template codes; accounts missing from your chart are left unchanged.
Email (SMTP) details
- Host, port (587 default), username, password, From address, From name, STARTTLS switch.
- Leave the host empty to use the platform default sender.
- The stored password is write-only: the field shows dots — leave it empty to keep the current one.
- STARTTLS on = port 587; untick it for implicit-SSL port 465.
FAQ
- Who can open Settings? Any role holding the Settings View permission (Administration module).
- Why is the company code read-only? It is the tenant identity and part of every login address.
- An account link is empty — what happens? Posting the affected document fails with a clear message; set the link first.
- Where are module options like the restaurant service charge? Module settings live as tabs of this same screen — no separate screens.
E-Invoicing (ZATCA)
Route: User menu › E-Invoicing — /zatca
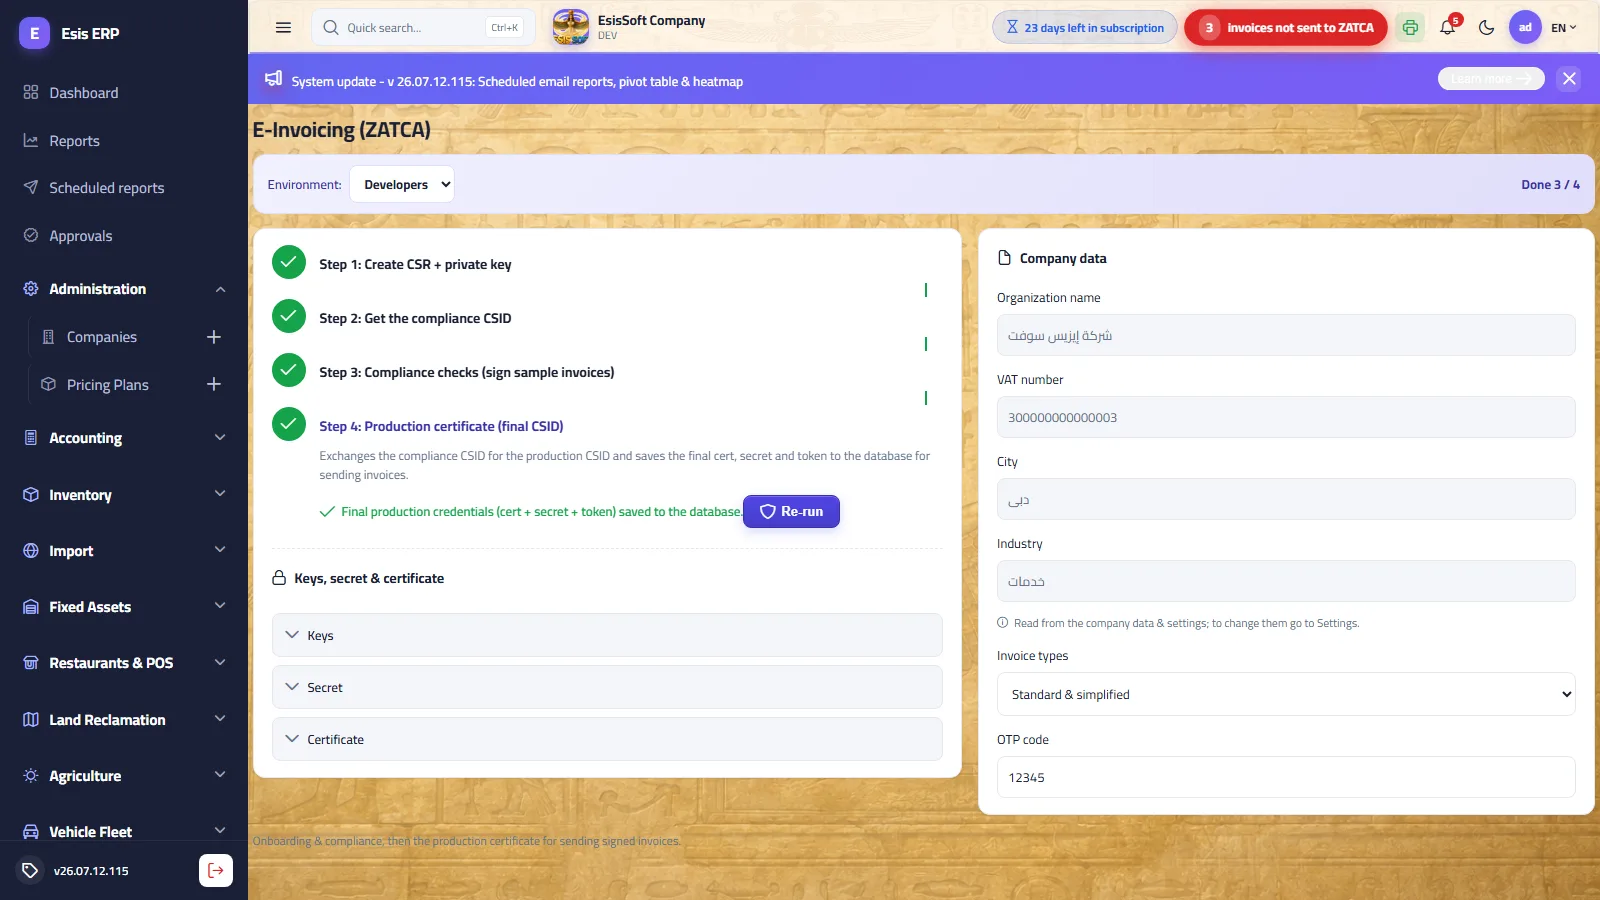
Purpose: the 4-step wizard that connects your company to ZATCA's Fatoora platform (Saudi e-invoicing, Phase 2 integration). Opening the screen asks for a daily access code — request it from your system administrator/support; it protects the certificates from accidental changes.
Environment
Pick the target environment at the top; the progress indicator shows how many of the 4 steps are done:
| Environment | Use | OTP |
|---|---|---|
| Developers | Sandbox for safe end-to-end testing. | Fixed test OTP 12345 — filled in automatically. |
| Simulation | ZATCA's dress rehearsal against your real VAT number. | Real OTP from the Fatoora portal (simulation section). |
| Production | Live legal invoicing. | Real OTP from the Fatoora portal. |
Company data panel
Organization name, VAT number, city and industry are read-only here — they come from Settings › Company profile. The VAT number must be 15 digits, starting and ending with 3. You choose on this screen only: the invoice types (Standard & simplified / Standard only / Simplified only) and the OTP.
The four steps and what each produces
- Create CSR + private key. Generates the EC private key and the certificate signing request locally, per ZATCA specifications. Nothing is sent to ZATCA yet. Produces: private key + CSR (visible in the credentials panel).
- Get the compliance CSID. Sends the CSR with your OTP to ZATCA. Produces: compliance certificate + compliance secret — the temporary credentials used for the tests.
- Compliance checks. The system signs and submits 6 sample invoices (standard/simplified: invoice, credit note, debit note) using the embedded signing engine. All six must pass. Produces: a cleared compliance record unlocking Step 4.
- Production certificate (final CSID). Exchanges the compliance CSID for the production one. Produces: production certificate + production secret + token, saved to the database — from now on invoices are signed and reported with these.
Below the wizard, a collapsible Keys, secret & certificate panel shows every stored credential (private key, CSR, compliance/production secret and certificate) read-only with copy buttons.
Worked example — sandbox onboarding end-to-end
- Verify Settings › Company profile has the legal name, a valid 15-digit VAT number and the city; then open E-Invoicing.
- Environment = Developers. The OTP fills with
12345automatically. - Step 1 › Create CSR + private key → "CSR created successfully".
- Step 2 › Get CSID → compliance CSID stored.
- Step 3 › Run compliance checks → all 6 sample documents pass.
- Step 4 › Get production certificate → final cert/secret/token saved.
- Turn on Settings › Sales & e-invoicing › Auto-send on posting, post a test sales invoice and confirm it reports successfully.
Troubleshooting
| Symptom | Cause / fix |
|---|---|
| OTP rejected (Step 2 fails) | Fatoora OTPs expire quickly — generate a fresh one and run the step immediately. Also confirm the OTP was issued for the same environment you selected (simulation vs production). |
| "Invalid VAT number" | Must be exactly 15 digits, first and last digit = 3. Fix it in Settings, not here. |
| Compliance checks fail | The error lists which sample failed. Usually company data changed after the CSR — re-run from Step 1. |
| Step 4 disabled | Steps run strictly in order — the production certificate needs cleared compliance checks first. |
FAQ
- Company data changed (name/VAT) — what now? Re-onboard: switch/reselect the environment and run the 4 steps again to issue fresh certificates.
- Do invoices send automatically? Only if the auto-send toggle is on; otherwise they are sent from the invoice send screen.
- Is the private key sent anywhere? No — it is generated and stored locally; only the CSR goes to ZATCA.
- Can I test without affecting real invoicing? Yes — that is exactly what the Developers environment is for.
Document counters
Route: User menu › Counters — /system/counters
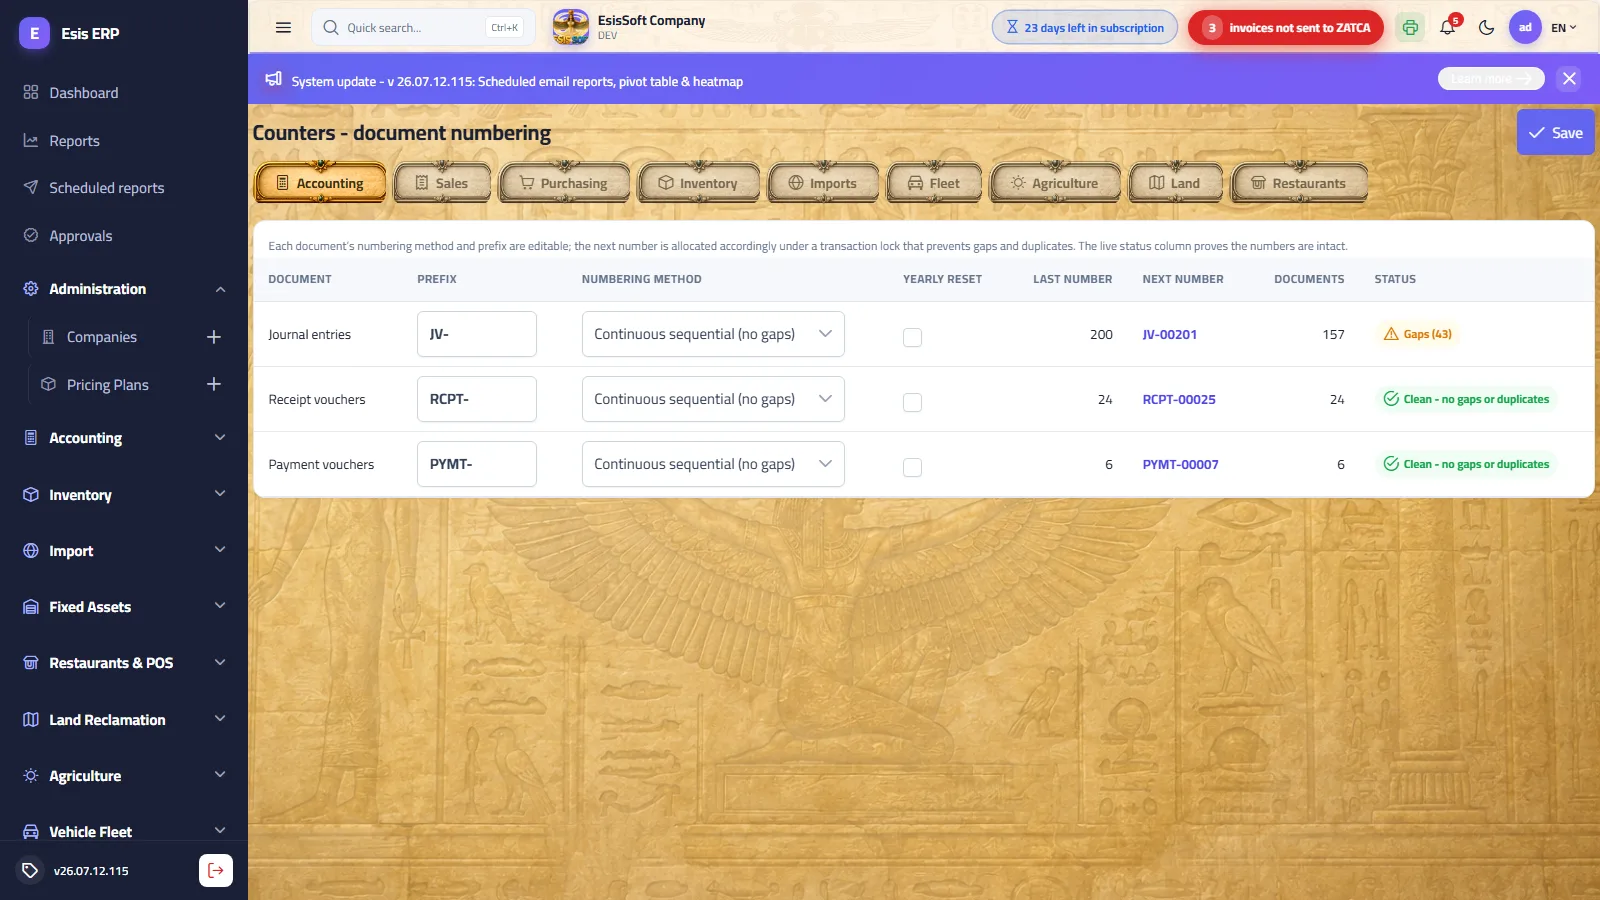
Purpose: one registry controlling the numbering of every document type, organized in module tabs: Accounting, Sales, Purchasing, Inventory, Imports, Fleet, Agriculture, Land, Restaurants. Numbers are allocated under a transaction lock, so no gaps or duplicates can occur.
Columns
| Column | Meaning |
|---|---|
| Document | The document type (see the code list below). |
| Prefix | Editable — typed lowercase is saved uppercase (e.g. INV, JV). |
| Numbering method | Continuous sequential (one company-wide counter, no gaps) or Per branch & year (an independent counter per branch per year, pattern PREFIX[BRANCH]-[YY]-00001). |
| Yearly reset | Restart from 1 each new year. Forced on (and locked) for the branch-&-year method. |
| Last / Next number | Live values — the next number shows exactly what the next document will get. |
| Documents | How many documents of this type exist. |
| Status | Live diagnostic: Clean (green), Gaps (yellow, with the count), Duplicates (red, with the count). |
Document types per module
| Module | Documents (default codes) |
|---|---|
| Accounting | Journal entries (JV), Receipt vouchers (RCPT), Payment vouchers (PYMT) |
| Sales | Sales invoices (SINV), Sales returns (SCN), Sales debit notes (SDN), Sales orders (SORD), Quotations (QUOT), Delivery notes (DLVN) |
| Purchasing | Purchase invoices (PINV), Purchase returns (PRET), Purchase orders (PORD), Purchase requisitions (PREQ) |
| Inventory | Goods receipts (GRN), Stock adjustments (ADJ), Inventory transfers (TRN) |
| Imports | Import shipments (SHIP) |
| Fleet | Trips (TRIP), Vehicle expenses (VEXP) |
| Agriculture | Seasons (SEAS), Season costs (ACST), Harvests (HARV) |
| Land | Reclamation projects (LPRJ), Project costs (LCST) |
| Restaurants | Restaurant orders (ORD) |
Worked example — sales invoices as INV with yearly reset
- Open Counters › tab Sales.
- On the "Sales invoices" row set Prefix =
INV. - Keep method = Continuous sequential and tick Yearly reset.
- Press Save (top of the page — it saves all rows at once) and check the "Next number" column.
- Result: invoices number INV-00001, INV-00002… and restart from 1 on January 1st. For branch-independent series instead, choose "Per branch & year" — e.g.
INV01-26-00001for branch 01 in 2026.
Troubleshooting — counter collision
- Status shows Duplicates (red): two documents share a number — typically after an external data import. The counter itself cannot produce duplicates; renumber/fix the imported documents, then re-check.
- Status shows Gaps (yellow): numbers missing from the sequence, usually deleted drafts or an import that skipped numbers. Gaps are informational; new numbers continue after the last one.
- Changed a prefix and old documents still show the old one: prefixes apply to newly issued numbers only — existing documents keep theirs.
FAQ
- Can two document types share a prefix? Technically yes, but avoid it — distinct prefixes keep search and archiving unambiguous.
- Can I make the counter start from a specific number? The next number follows the highest existing document; there is no manual override — this protects the no-gaps guarantee.
- Does the yearly reset delete anything? No — it only restarts the numbering; previous years' documents are untouched.
Print Designer
Route: User menu › Print Designer — /system/print-designer
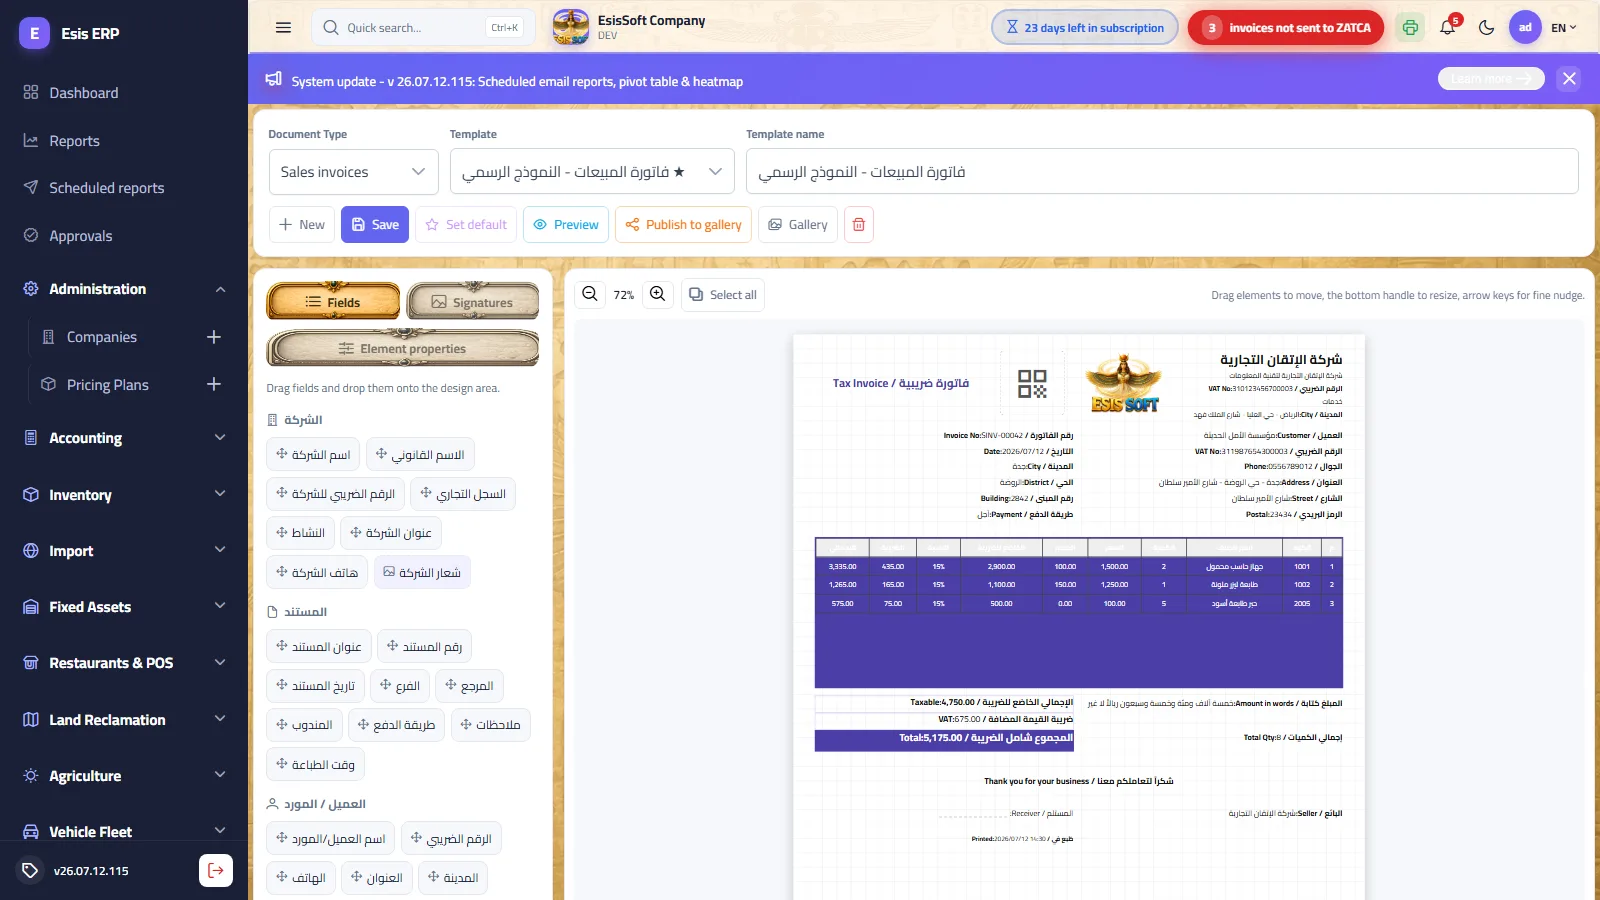
Purpose: a drag-and-drop designer for the printed layout of every transaction document (invoice, voucher, quotation…). Templates are stored in the database per document type; the template marked default is the one used when users print that document.
Toolbar
- Document type — pick which document you are designing (same list as the Counters screen).
- Template selector, New template, template name, Save, Set default, Delete.
- Preview (with sample data) and Print from the preview.
- Publish to gallery / Gallery — share and reuse designs across companies (see below).
- Zoom in/out of the A4 canvas.
Palette (side panel)
| Tab | Contents |
|---|---|
| Fields | Document fields in groups — drag any field onto the canvas. Includes a "Custom fields (from database)" group that appears automatically when extra columns exist. Extra elements: free text label, line, items table (choose its columns), QR code (ZATCA QR on invoices), company logo — plus a "Place logo as watermark" toggle. |
| Signatures | Your uploaded signature/stamp image library (max 1 MB each) — drag onto the canvas. |
| Element properties | For the selected element: label, show-label switch, text, font size, bold, alignment, background/text colour, border, table columns, remove. |
Canvas editing
- Drag to move; bottom handle to resize; arrow keys nudge 1px (Shift = 10px).
- Click selects; Shift/Ctrl-click multi-selects; Ctrl+A selects all — a selected group moves together.
- Double-click an element to jump to its properties tab; Delete removes the selection.
Shared gallery
Publish puts a layout-only copy of your template in the cross-company gallery. Gallery lets you preview any published design and Clone it into your own templates — only the design is copied, never data.
Worked example — an official sales invoice layout
- Document type = Sales invoices › New template › name it "Official layout".
- Drag the logo to the top corner, then company name, VAT number and invoice number/date fields into the header.
- Drag the items table, open its properties and tick exactly the columns you want.
- Drag the QR code near the footer, add a totals field and a signature image.
- Preview with sample data, adjust, Save, then Set default — all invoice printing now uses it.
FAQ
- Multiple templates per document? Yes — keep several and switch the default at any time.
- Signature upload rejected? Images are limited to 1 MB — compress and retry.
- Does cloning from the gallery expose my numbers? No — gallery entries carry the layout only.
- Custom database fields? They appear automatically in the "Custom fields" group, no rebuild needed.
Approvals
Route: Sidebar › Approvals — /approvals
Purpose: the document approval workflow: an inbox of approval requests plus (for administrators) the rules that create them. When a rule is enabled, posting a matching document does not post it directly — it becomes a pending approval request, and the document posts automatically upon final approval. The page title shows a badge counting requests awaiting you.
Inbox tabs
| Tab | Shows |
|---|---|
| Awaiting me | Requests you can act on now (your role is the current approver). |
| My requests | Requests created from your own documents, with their status. |
| All | Every request — the audit view. |
| Rules | Visible only to users allowed to manage the rules. |
Each row shows: document type, document number, amount, requested by, date, status (Pending — with "level 2" when at the second stage — Approved or Rejected) and any notes. Pending rows you may act on offer Approve and Reject buttons.
Defining rules
The Rules tab lists one row per supported document type — Sales invoice, Purchase invoice, Receipt voucher, Payment voucher — with:
| Column | Meaning |
|---|---|
| Enabled | Turns the workflow on for this document type. |
| Approver role | The role whose members may approve (level 1). |
| Second level (optional) | A second role that must approve after level 1. Leave empty for single-level approval. |
| Min amount | Only documents with amount ≥ this threshold need approval; smaller ones post straight through. 0 = every document. |
The flow, end to end
- Admin enables a rule — e.g. Purchase invoice, approver role "Finance Manager", second level "General Manager", min amount 10,000.
- A clerk posts a purchase invoice of 15,000 → instead of posting, a Pending request appears (his "My requests" tab).
- Every Finance Manager sees it under Awaiting me with a badge. One clicks Approve, optionally adds a note, and confirms Approve & post.
- Because a second level exists, the request stays Pending "(level 2)" and moves to the General Manager's inbox.
- On final approval the document posts automatically (journal entry, stock, numbering). On Reject — a rejection reason is mandatory — the document stays unposted and the requester sees the reason.
FAQ
- Can I approve my own document? If your role is the approver role, yes — assign approver roles so that this doesn't happen where separation of duties matters.
- What happens to a rejected document? Nothing is posted; correct it and post again to create a fresh request.
- Documents below the threshold? They post immediately, no request is created.
- Why don't I see the Rules tab? It appears only for users permitted to manage roles/settings.
The validation rule editor
Path: Administration → Validation → Rule editor — /admin/custom-rules
What it does: Build a rule that belongs to your company without a developer — it is evaluated like any built-in rule, and its usefulness is measured the same way: how often it fired, and how often someone changed something because of it.
| Field | Description |
|---|---|
| Start from a template | Three ready templates: quantity above stock, price below cost, and document over a limit — edited rather than written from scratch. |
| Rule name | What it is called in the list and in the usefulness report. |
| Document types | The ones it is measured on — or all of them. |
| Scope | The whole document (its total, say) or every line separately. |
| Conditions | A field, a comparison and a value — or a comparison to another field (quantity against stock, price against cost). |
| Match | All conditions, or any of them. |
| Rule threshold | A number the conditions use, so the rule is written once and its number set here. |
| Message | The alert’s title and body — with field values inserted so the figures are quoted correctly. |
| Preview | A sentence in your own language saying what the rule will do, before you save it. |
Dimension-combination rules
Path: Administration → Validation → Dimension combinations — /admin/dimension-rules
What it does: Which cost centre, project, branch or cost item is allowed on which account. Each is valid on its own while the combination is wrong — and that is exactly what field-by-field validation cannot catch.
| Field | Description |
|---|---|
| Rule name | For example: marketing expenses to marketing centres. |
| Account | A single account or a group — choosing a group applies the ruling to all its accounts without writing one rule each. |
| Dimension | Three sit on the journal line (cost centre, project, cost item) and the branch on the document header — so a branch rule is measured on all its lines. |
| Target | The centre or project in question — and its children follow it wherever the dimension has a tree. |
| Mode | “Allow” confines: anything but the chosen is refused. “Deny” excludes: only the chosen is refused. |
| Any target | Instead of naming a centre: the account and everything under it takes no such dimension at all — with “deny” only. |
| Preview | A sentence reading the rule back as it will apply. |
The budget
Path: Administration → Validation → Budget — /admin/budget-entries
What it does: The plan is written here and every entry is measured against it the moment it is entered — not in a report at month end, by which time the money is spent.
| Field | Description |
|---|---|
| Year and month | No month means the year’s budget; a month means that month’s — and the two work together. |
| Account | An account or a group — a group is measured across all its accounts together. |
| Cost centre | Leave it empty and the plan governs the whole company; pick a centre and it governs that centre alone. |
| Planned amount | The ceiling. |
| Consumed and usage | What has actually been spent, and its share of the plan. |
The permission-conflict matrix
Path: Administration → Validation → Permission conflicts — /admin/permission-conflicts
What it does: Pairs of permissions that must not sit in one pair of hands — whoever holds both “create supplier” and “pay supplier” can invent a creditor and then pay it. The matrix stops the capability before the act.
| Field | Description |
|---|---|
| First and second permission | The two sides of the pair. |
| Reason | This text is what the person whose role is refused actually reads — write it for their eyes. |
| Mode | “Block” refuses to save a role holding both; “watch” only surfaces the breach — for small companies that don’t have two hands to separate. |
| Breaches standing today | Who currently holds both sides of a pair, across every role. |
The activity profile of each role
Path: Administration → Validation → Role activity profiles — /admin/role-activities
What it does: A permission says “can”; a profile says “usually”. Set, for each role, the document types that are its daily work — and when someone works outside them a warning is shown and logged, not blocked: blocking is the permissions’ business.
| Field | Description |
|---|---|
| Role | Every role in the company. |
| Usual document types | What its holders work on day to day. |
| No profile | A role with nothing set — its holders are not measured. |
Consolidating a group of companies
Path: Administration → Platform → Group consolidation — /admin/consolidation
What it does: Someone who owns four companies is not running four businesses but one. Yet “what did the group earn?” is not answered by adding four trial balances, because the companies sell to each other: one riyal becomes revenue in one ledger and cost in another, and the group looks as though it traded twice with money that never left it.
| Field | Description |
|---|---|
| Parent and members | The group is presented in the parent’s currency, and the parent itself must be among the members. |
| Ownership and method | The percentage held, and full consolidation for a subsidiary or the equity method for an associate. |
| Translation, closing and average rates | Per IAS 21: assets and liabilities at closing, income and expenses at average, equity at historic. |
| Intercompany pairs | Each relationship has two accounts: one in one company facing one in another — receivables against payables, sales against purchases. |
| Goodwill and investment elimination | The cost of investment and its account in the parent, the net assets at acquisition and the equity account in the subsidiary. Goodwill = cost − ownership × net assets at acquisition. |
| Unrealised profit in stock | What one company sold to its sister at a profit and still sits in the buyer’s stock at period end. |
| Non-controlling interests | The share of those who own the rest — presented separately rather than implicitly counted as the group’s. |
| The result | Combined before elimination, eliminated, and consolidated — split into what belongs to the parent’s owners and what belongs to the NCI. |
Platform-administration screens
Path: Administration → Platform and content — /admin/*
What it does: Eight screens that customer companies never see; they belong to the ESIS SOFT team that runs the platform itself. They are listed here for completeness, not for use.
| Field | Description |
|---|---|
| Module pricing | Each module’s per-user price in each pricing region, with a calculator showing the monthly total. Every region has its own price list in its own currency — not a conversion of the base region’s. |
| Regional compliance | Flagging a company that declares one country and is used from another — with the evidence, so it is either accepted with a declaration or moved to its correct billing region. |
| Articles | The marketing site’s blog content in three languages. |
| Testimonials | The customer-testimonial images shown on the site, optionally linked to a Google Maps review. |
| Demo requests | What arrives from the site’s form: name, company, phone and plan — and the email reply. |
| Tenants and the platform overview | The list of subscribing companies and their state, and the platform’s own indicator board — running the subscriptions themselves. |
| Assistant learning | Questions the KEMTOVA assistant did not understand: reviewed, given a pattern, match forms and a query so they become known — or ignored. |
Switches that reshape the whole system
Path: User menu → Settings → Company / Sales — /settings
What it does: Three options that set no number but hide or reveal fields, columns and reports across every screen — because what your company does not need should not take up its screen.
| Field | Description |
|---|---|
| VAT handling | A company with no VAT hides the tax columns from every document and screen, and tax is zeroed on the server whatever the item’s rate says. |
| Working with cost centres | A company that does not split its activity across centres — a wholesaler, say — hides the cost-centre field and column from every document, and the centre reports and their setup screen go with them. |
| Contracting module profile | “Lite” hides the advanced contracting screens — tenders, subcontractors, valuations, scheduling, payroll — and keeps what a small contractor needs. |
| Inventory cost basis | Weighted average cost, or the purchase price on the item card — and that is what values the reports and computes cost of sales on posting. |
| After saving or posting | Whether the system opens a new document automatically after posting, after both saving and posting, or stays as it is. |
The module tabs in settings
Path: User menu → Settings → Module tabs — /settings
What it does: Every module’s settings are a tab here rather than a screen of their own — so there is one place to configure things. Only the tabs your company’s modules enable are shown.
| Field | Description |
|---|---|
| Notifications | The WhatsApp channel: the official connection or an alternative provider, the number id and token, a test number, the webhook URLs and customers’ opt-ins. |
| ZATCA integration | The Saudi e-invoicing certificates and the connection’s state. |
| Egyptian Tax Authority | Client id, activity code and branch id, and the environment: pre-production or live. |
| Restaurant | Receipt footer, kitchen printer, the warehouse ingredients come off, and the service charge — and from here the QR poster for the public menu. |
| Schools | The daily late fine, the loan period and its limit, the working days, and the admission fee with its introduction text. |
| Accounting offices | How many days before a document expires and before a hearing you are reminded. |
| Ready-mix concrete | Minimum load quantity; free waiting minutes with the item and hourly rate that charge for the rest; the pump item, its charging mode (per m³ or flat) and rate; and the production settings. |
| Subscription contracts | The default notice days before renewal. |
| Workshop | The amount above which a repair needs approval, the default warehouse, and the disclaimer text printed on the repair order. |
| Contracting | The module profile: full or lite. |
| Local content | The rules for computing the local-content percentage — including whether labour, energy and handling count as local. |
Emailing documents once they post
Path: Settings → Email → Emailing documents — /maintaniance/Settings?tab=email
What it does: A posted invoice reaches its customer on its own. You choose which types are sent, and after any of them posts the document is rendered as a PDF and emailed to the customer or supplier named on it.
| Field | Description |
|---|---|
| Document type | A switch per type — a type left off is not sent. |
| Subject and body | A template per type, in the recipient’s language. |
| Available variables | The document’s number, date and total and your company’s name — inserted into the subject and body and filled in at send time. |
Frequently asked questions
How do I add a user?
Open Administration › Users › New, set the username, contact details and initial password, then assign one or more roles that grant the needed permissions.
How do roles and permissions work?
Permissions are grouped into roles; you assign roles to users. The protected SuperAdmin role has full access and cannot be removed.
How do I unlock a locked-out user?
In Administration you can view and unlock users who were locked after failed logins, restoring their access immediately.
What settings does the admin control?
Company profile, numbering, tax defaults, print templates, e-invoicing (ZATCA), and — for the host company — tenants, pricing plans and the platform overview.